This would be entire project context. Whatever you do in IntelliJ IDEA, you do that in the context of a project. A project is an organizational unit that represents a complete software solution. A project in Android Studio is like a workspace in Eclipse. In android Studio a project, can contain multiple modules. A module in Android Studio is like a project in Eclipse. In the above screenshot “LoginAuthenticator” is the name of my project
This means that, in theory it is possible to build multiple apps with in the same project. From my personal experience, creating multiple apps with in the same project doesn’t work well. So, I recommend not making your hands dirty trying the same thing. Instead, it is a better idea to create single app per single project.
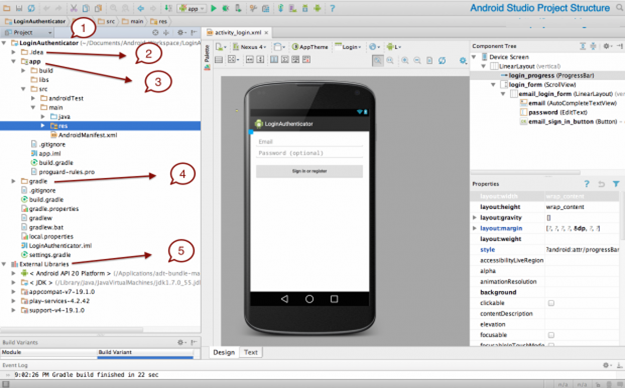
Project Module: This is the actual project folder where your application code resides. The application folder has following sub directories
build: This has all the complete output of the make process i.e. classes.dex, compiled classes and resources, etc.
In the Android Studio GUI, only a few folders are shown. The important part is that your R.java is found here under build/source/r/<build variant>/<package>/R.java
libs : This is a commonly seen folder in eclipse land too, which optionally can hold the libraries or .jar files.
src: The src folder can have both application code and android unit test script. You will find two folders named “androidTest” and “main” correspond to src folder. The main folder contains two subfolders java and res. The java folder contains all the java codes and res contains drawables, layouts, etc.
gradle: This is where the gradle build system’s jar wrapper i.e. this jar is how AS communicates with gradle installed in Windows (the OS in my case).
External Libraries: This is not actually a folder but a place where Referenced Libraries and information on targeted platform SDK is shown.
Android Resources Organizing & Accessing
There are many more items which you use to build a good Android application. Apart from coding for the application, you take care of various other resources like static content that your code uses, such as bitmaps, colors, layout definitions, user interface strings, animation instructions, and more. These resources are always maintained separately in various sub-directories under res/ directory of the project.
This tutorial will explain you how you can organize your application resources, specify alternative resources and access them in your applications.
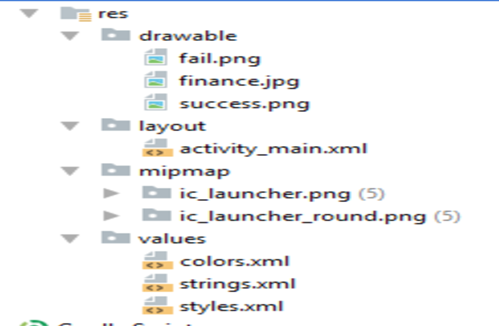
anim: XML files that define property animations. They are saved in res/anim/ folder and accessed from the R.anim class.
color: XML files that define a state list of colors. They are saved in res/color/ and accessed from the R.color class. Drawable: Image files like .png, .jpg, .gif or XML files that are compiled into bitmaps, state lists, shapes, animation drawable. They are saved in res/drawable/ and accessed from the R.drawable class.
Layout:XML files that define a user interface layout. They are saved in res/layout/ and accessed from the R.layout class.
menu: XML files that define application menus, such as an Options Menu, Context Menu, or Sub Menu. They are saved in res/menu/ and accessed from the R.menu class.
raw: Arbitrary files to save in their raw form. You need to call Resources.openRawResource with the resource ID, which is R.raw.filename to open such raw files.
values: XML files that contain simple values, such as strings, integers, and colors. For example, here are some filename conventions for resources you can create in this directory −
arrays.xml : for resource arrays, and accessed from the R.array class.
integers.xml: for resource integers, and accessed from the R.integer class.
bools.xml: for resource boolean, and accessed from the R.bool class.
colors.xml: for color values, and accessed from the R.color class.
imens.xml: for dimension values, and accessed from the R.dimen class.
strings.xml: for string values, and accessed from the R.string class.
styles.xml : for styles, and accessed from the R.style class.
xml: Arbitrary XML files that can be read at runtime by calling Resources.getXML. You can save various configuration files here which will be used at run time.
Alternative Resources
Your application should provide alternative resources to support specific device configurations. For example, you should include alternative drawable resources i.e.imagesi.e.images for different screen resolution and alternative string resources for different languages. At runtime, Android detects the current device configuration and loads the appropriate resources for your application.
To specify configuration-specific alternatives for a set of resources, follow the following steps −
Create a new directory in res/ named in the form <resources_name>-<config_qualifier>. Here resources_name will be any of the resources mentioned in the above table, like layout, drawable etc. The qualifier will specify an individual configuration for which these resources are to be used. You can check official documentation for a complete list of qualifiers for different type of resources.
Save the respective alternative resources in this new directory. The resource files must be named exactly the same as the default resource files as shown in the below example, but these files will have content specific to the alternative. For example though image file name will be same but for high resolution screen, its resolution will be high.
Below is an example which specifies images for a default screen and alternative images for high resolution screen.
Accessing Resources
During your application development you will need to access defined resources either in your code, or in your layout XML files. Following section explains how to access your resources in both the scenarios −
Accessing Resources in Java
When your Android application is compiled, a R class gets generated, which contains resource IDs for all the resources available in your res/ directory. You can use R class to access that resource using sub-directory and resource name or directly resource ID.
Example: To access res/drawable/myimage.png and set an ImageView you will use following code −
ImageView imageView = (ImageView) findViewById(R.id.myimageview);
imageView.setImageResource(R.drawable.myimage);
Here first line of the code make use of R.id.myimageview to get ImageView defined with id myimageview in a Layout file. Second line of code makes use of R.drawable.myimage to get an image with name myimage available in drawable sub-directory under /res.
Consider next example where res/values/strings.xml has following definition −
<?xml version=”1.0″ encoding=”utf-8″?>
<resources>
<string name=”hello”>Hello, World!</string>
</resources>
Now you can set the text on a TextView object with ID msg using a resource ID as follows −
TextView msgTextView = (TextView) findViewById(R.id.msg);
msgTextView.setText(R.string.hello);
Example: Consider a layout res/layout/activity_main.xml with the following definition −
<?xml version=”1.0″ encoding=”utf-8″?>
<LinearLayout xmlns:android=http://schemas.android.com/apk/res/android
android:layout_width=”fill_parent”
android:layout_height=”fill_parent”
android:orientation=”vertical” >
<TextView android:id=”@+id/text”
android:layout_width=”wrap_content”
android:layout_height=”wrap_content”
android:text=”Hello, I am a TextView” />
<Button android:id=”@+id/button”
android:layout_width=”wrap_content”
android:layout_height=”wrap_content”
android:text=”Hello, I am a Button” />
</LinearLayout>
This application code will load this layout for an Activity, in the onCreate method as follows −
public void onCreate(Bundle savedInstanceState) {
super.onCreate(savedInstanceState);
setContentView(R.layout.main_activity);
}
Accessing Resources in XML
Consider the following resource XML res/values/strings.xml file that includes a color resource and a string resource −
<?xml version=”1.0″ encoding=”utf-8″?>
<resources>
<color name=”opaque_red”>#f00</color>
<string name=”hello”>Hello!</string>
</resources>
Now you can use these resources in the following layout file to set the text color and text string as follows −
<?xml version=”1.0″ encoding=”utf-8″?>
<EditText xmlns:android=http://schemas.android.com/apk/res/android
android:layout_width=”fill_parent”
android:layout_height=”fill_parent”
android:textColor=“@color/opaque_red”
android:text=“@string/hello” />
Now if you will go through previous chapter once again where I have explained Hello World! example, and I’m sure you will have better understanding on all the concepts explained in this chapter. So I highly recommend to check previous chapter for working example and check how I have used various resources at very basic level.