A content provider manages access to a central repository of data. A provider is part of an Android application, which often provides its own UI for working with the data. However, content providers are primarily intended to be used by other applications, which access the provider using a provider client object. Together, providers and provider clients offer a consistent, standard interface to data that also handles inter-process communication and secure data access.
Typically you work with content providers in one of two scenarios; you may want to implement code to access an exiting content provider in another application, or you may want to create a new content provider in your application to share data with other applications. This topic covers the basics of working with existing content providers
A content provider presents data to external applications as one or more tables that are similar to the tables found in a relational database. A row represents an instance of some type of data the provider collects, and each column in the row represents an individual piece of data collected for an instance.
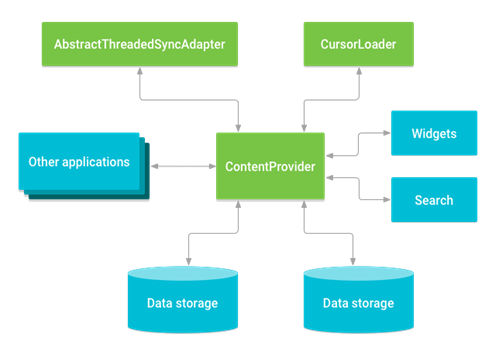
A content provider coordinates access to the data storage layer in your application for a number of different APIs and components as illustrated in figure 1, these include:
Sharing access to your application data with other applications
Sending data to a widget
Returning custom search suggestions for your application through the search framework using SearchRecentSuggestionsProvider
Synchronizing application data with your server using an implementation of AbstractThreadedSyncAdapter Loading data in your UI using a CursorLoader
Accessing a provider
When you want to access data in a content provider, you use the ContentResolver object in your application’s Context to communicate with the provider as a client. The ContentResolver object communicates with the provider object, an instance of a class that implements ContentProvider. The provider object receives data requests from clients, performs the requested action, and returns the results. This object has methods that call identically-named methods in the provider object, an instance of one of the concrete subclasses of ContentProvider. The ContentResolver methods provide the basic “CRUD” (create, retrieve, update, and delete) functions of persistent storage.
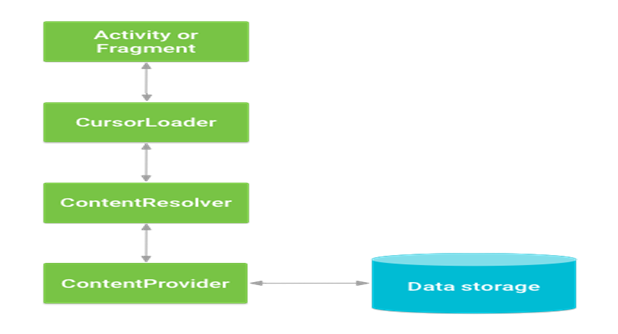
A common pattern for accessing a ContentProvider from your UI uses a CursorLoader to run an asynchronous query in the background. The Activity or Fragment in your UI call a CursorLoader to the query, which in turn gets the ContentProvider using the ContentResolver. This allows the UI to continue to be available to the user while the query is running. This pattern involves the interaction of a number of different objects, as well as the underlying storage mechanism, as illustrated in figure
Here we will discuss about one of the content provide how to acces the data from google
If you want to signup with google account first of all need to create project in console. below we discuss everything.
Creating a Project at Google Developers Console
Log in to Google Plus account and go to thisurl(https://console.developers.google.com/apis/library) and click on create project.
Now fill the details and click on create.
Now we need a configuration file for our android app. So go to this link. Select your app we just created on developer console. And write the package name of your android studio project we created. Finally choose country and click on continue.
Genearting SHA1 Key
In the next screen you will asked for SHA-1. To get SHA-1 Certificate. Open command prompt and navigate to jdk/bin folder. Write the following command and hit enter
Note: Make sure you have changed c:\users\belal\ with c:\users\your_user_name in the above command
keytool -list -v -keystore “%USERPROFILE%\.android\debug.keystore” -alias androiddebugkey -storepass android -keypass android
Copy the SHA1 and paste it to the Enable Google Services Page.
Now click on Enable Google Signin. And click on Continue to Generate Configuration Files. Now click on download google-services.json to get your configuration file. Now come to android studio.
Google Login Android Project
Copy the json configuration file (you just downloaded) and paste it inside your google login android studio project (Inside app/ directory).
Open the Top Level build.gradle file and add the following line inside dependencies
classpath 'com.google.gms:google-services:1.5.0-beta2'Inside build.gradle file add the following dependencies and sync your google login android project.
compile 'com.google.android.gms:play-services-auth:8.3.0'
compile 'com.mcxiaoke.volley:library-aar:1.0.0'
The second line is for adding volley. I will use volley to load user’s profile image.
Activity_main.xml
<?xml version="1.0" encoding="utf-8"?>
<LinearLayout xmlns:android="http://schemas.android.com/apk/res/android"
    android:orientation="vertical"
    android:layout_width="match_parent"
    android:layout_height="match_parent"
    android:paddingBottom="@dimen/activity_vertical_margin"
    android:paddingLeft="@dimen/activity_horizontal_margin"
    android:paddingRight="@dimen/activity_horizontal_margin"
    android:paddingTop="@dimen/activity_vertical_margin">
    <com.google.android.gms.common.SignInButton
        android:id="@+id/sign_in_button"
        android:layout_width="wrap_content"
        android:layout_height="wrap_content"
        android:layout_gravity="center_horizontal" />
    <com.android.volley.toolbox.NetworkImageView
        android:id="@+id/profileImage"
        android:layout_width="wrap_content"
        android:layout_height="wrap_content" />
    <TextView
        android:text="Name"
        android:layout_width="wrap_content"
        android:layout_height="wrap_content" />

    <TextView
        android:id="@+id/textViewName"
        android:textStyle="bold"
        android:layout_width="wrap_content"
        android:layout_height="wrap_content" />

    <TextView
        android:text="email"
        android:layout_width="wrap_content"
        android:layout_height="wrap_content" />
    <TextView
        android:id="@+id/textViewEmail"
        android:textStyle="bold"
        android:layout_width="wrap_content"
        android:layout_height="wrap_content" />
</LinearLayout>
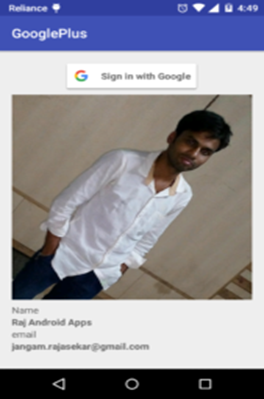
As you can see I have created a google plus login button with two TextView (to show name and email) and a NetworkImageView (to show profile pic).
Now come to MainActivity.java and write the following code.
MainActivity.java
package com.androindian.google;

import android.content.Intent;
import android.support.v7.app.AppCompatActivity;
import android.os.Bundle;
import android.util.Log;
import android.view.View;
import android.widget.TextView;
import android.widget.Toast;
import com.android.volley.toolbox.ImageLoader;
import com.android.volley.toolbox.NetworkImageView;
import com.google.android.gms.auth.api.Auth;
import com.google.android.gms.auth.api.signin.GoogleSignInAccount;
import com.google.android.gms.auth.api.signin.GoogleSignInOptions;
import com.google.android.gms.auth.api.signin.GoogleSignInResult;
import com.google.android.gms.common.ConnectionResult;
import com.google.android.gms.common.SignInButton;
import com.google.android.gms.common.api.GoogleApiClient;

public class MainActivity extends AppCompatActivity implements View.OnClickListener, GoogleApiClient.OnConnectionFailedListener {
    //Signin button
    private SignInButton signInButton;
    //Signing Options
    private GoogleSignInOptions gso;
    //google api client
    private GoogleApiClient mGoogleApiClient;
    //Signin constant to check the activity result
    private int RC_SIGN_IN = 100;
    //TextViews
    private TextView textViewName;
    private TextView textViewEmail;
    private NetworkImageView profilePhoto;
    //Image Loader
    private ImageLoader imageLoader;
    @Override
    protected void onCreate(Bundle savedInstanceState) {
        super.onCreate(savedInstanceState);
        setContentView(R.layout.activity_main);
        //Initializing Views
        textViewName = (TextView) findViewById(R.id.textViewName);
        textViewEmail = (TextView) findViewById(R.id.textViewEmail);
        profilePhoto = (NetworkImageView) findViewById(R.id.profileImage);
        //Initializing google signin option
        gso = new GoogleSignInOptions.Builder(GoogleSignInOptions.DEFAULT_SIGN_IN)
                .requestEmail()
                .build();
        //Initializing signinbutton
        signInButton = (SignInButton) findViewById(R.id.sign_in_button);
        signInButton.setSize(SignInButton.SIZE_WIDE);
        signInButton.setScopes(gso.getScopeArray());
        //Initializing google api client
        mGoogleApiClient = new GoogleApiClient.Builder(this)
                .enableAutoManage(this /* FragmentActivity */, this /* OnConnectionFailedListener */)
                .addApi(Auth.GOOGLE_SIGN_IN_API, gso)
                .build();
        //Setting onclick listener to signing button
        signInButton.setOnClickListener(this);
    }
    //This function will option signing intent
    private void signIn() {
        //Creating an intent
        Intent signInIntent = Auth.GoogleSignInApi.getSignInIntent(mGoogleApiClient);
        //Starting intent for result
        startActivityForResult(signInIntent, RC_SIGN_IN);
    }
    @Override
    public void onActivityResult(int requestCode, int resultCode, Intent data) {
        super.onActivityResult(requestCode, resultCode, data);
        //If signin
        if (requestCode == RC_SIGN_IN) {
            GoogleSignInResult result = Auth.GoogleSignInApi.getSignInResultFromIntent(data);
            //Calling a new function to handle signin
            handleSignInResult(result);
        }
    }
    //After the signing we are calling this function
    private void handleSignInResult(GoogleSignInResult result) {
        //If the login succeed
        if (result.isSuccess()) {
            //Getting google account
            GoogleSignInAccount acct = result.getSignInAccount();
            //Displaying name and email
            textViewName.setText(acct.getDisplayName());
            textViewEmail.setText(acct.getEmail());
            //Initializing image loader
            imageLoader = CustomVolleyRequest.getInstance(this.getApplicationContext())
                    .getImageLoader();
            imageLoader.get(acct.getPhotoUrl().toString(),
                    ImageLoader.getImageListener(profilePhoto, R.mipmap.ic_launcher,                        R.mipmap.ic_launcher));
            //Loading image
            profilePhoto.setImageUrl(acct.getPhotoUrl().toString(), imageLoader);

        } else {
            //If login fails
            Toast.makeText(this, "Login Failed", Toast.LENGTH_LONG).show();
        }
    }
    @Override
    public void onClick(View v) {
        if (v == signInButton) {
            //Calling signin
            signIn();
        }
    }
    @Override
    public void onConnectionFailed(ConnectionResult connectionResult) {
    }
}
For loading image from URL I have used a Custom Volley Request from an old tutorial Load Image from Internet Using Volley. For the custom volley request you have to create the following class.
package com.androindian.google;
import android.content.Context;
import android.graphics.Bitmap;
import android.support.v4.util.LruCache;
import com.android.volley.Cache;
import com.android.volley.Network;
import com.android.volley.RequestQueue;
import com.android.volley.toolbox.BasicNetwork;
import com.android.volley.toolbox.DiskBasedCache;
import com.android.volley.toolbox.HurlStack;
import com.android.volley.toolbox.ImageLoader;

public class CustomVolleyRequest {
    private static CustomVolleyRequest customVolleyRequest;
    private static Context context;
    private RequestQueue requestQueue;
    private ImageLoader imageLoader;

    private CustomVolleyRequest(Context context) {
        this.context = context;
        this.requestQueue = getRequestQueue();
        imageLoader = new ImageLoader(requestQueue,
                new ImageLoader.ImageCache() {
                    private final LruCache<String, Bitmap>
                            cache = new LruCache<String, Bitmap>(20);
                    @Override
                    public Bitmap getBitmap(String url) {
                        return cache.get(url);
                    }
                    @Override
                    public void putBitmap(String url, Bitmap bitmap) {
                        cache.put(url, bitmap);
                    }
                });
    }
    public static synchronized CustomVolleyRequest getInstance(Context context) {
        if (customVolleyRequest == null) {
            customVolleyRequest = new CustomVolleyRequest(context);
        }
        return customVolleyRequest;
    }
    public RequestQueue getRequestQueue() {
        if (requestQueue == null) {
            Cache cache = new DiskBasedCache(context.getCacheDir(), 10 * 1024 * 1024);
            Network network = new BasicNetwork(new HurlStack());
            requestQueue = new RequestQueue(cache, network);
            requestQueue.start();
        }
        return requestQueue;
    }
    public ImageLoader getImageLoader() {
        return imageLoader;
    }
}
Now add internet permission to your manifest and run your google login android application